
Jump Ahead To:
How to change an oil filter housing gasket for BMW 2014 X3 F25.
It is a matter of time before your oil filter housing gasket will start to leak oil and make a mess of things. luckily for you, in this article, I will be explaining how you can change the gasket yourself the right way so that it doesn’t create future problems down the line so you can continue ownership of your vehicle.
But first, here’s a list of the tools you will need.
[su_list icon=”icon: car” icon_color=”#FE8E48″]
- Female Torx socket E10 and E12
- 3/8 and 1/4 ratchet
- 8MM wrench
- Oil filter tool
- 11MM socket
[/su_list]
BMW F25 2014 X3 case study.
If you are reading this article then chances are you opened the hood of your car one day and noticed a massive oil leak concentrated in the front of the engine.
Trust me when I say you are definitely not the first person in this world to suffer from the notorious oil leaks from your BMW car.
Valve cover gaskets, oil pan gaskets, rear main seals, and oil filter housing gaskets are the major areas where you will experience oil leaks on your engine.
The engine in this X3 is the BMW N55 engine and this article can be also used to help you if you have this engine installed in other applications so it won’t be just limited to this vehicle.
Today I will be writing an in-depth guide on how you can change your own oil filter housing gasket and save on costly repairs at your local stealership. so continue reading and follow along!
What is an oil filter housing?
The oil filter housing is an essential component of any vehicle that uses oil for lubrication. The housing protects the filter from debris and other contaminants that could clog it, and also provides a way to easily change the filter when necessary.
The housing is typically made of metal or plastic and is located near the oil pump. It is connected to the engine via a series of pipes, and usually has a drain plug that allows used oil to be drained away.
In most cases, the oil filter housing will also contain a pressure relief valve, which helps to prevent excessive build-up of pressure within the housing.
The moving parts must be well lubricated to prevent wear and prevent as much friction as possible to maintain the longevity of the engine.
An oil pump which is usually bolted at the bottom of the engine and is driven by the engine forces oil up into an oil filter then the oil passes through the rest of the block and cylinder head to lubricate the whole engine.
Oil is forced up to the oil filter housing and in essence, cleans the oil that comes from the oil pan and then travels to the other oil galleries and then returns back to the oil pan by special bores in the engine and drains back down.
Oil temperature is a big factor in any engine and especially for high-performance engines like BMW cars. a larger oil pan helps control overall temperatures and in some cases like the turbo applications then a separate oil cooler is installed in the vehicle.
Another cool fact is that Coolant flows through the oil filter housing to help warm the oil when the engine is cold and helps cool it down when the engine is hot.
Now for the meat and potatoes of this article. down below is where I will show you step-by-step how to replace yours if your gasket goes bad and oil starts to leak out and create a mess as it does in most cars.
How to change an oil filter housing.
Now if you are not familiar with any of the terms or any technical stuff regarding your car then don’t sweat it and never worry too much because I am here to explain it to you the best I can in order to help you.
It can be a daunting task if you are not experienced with anything that has to do with the mechanics behind how your car works and such.
As you follow along with my tutorials I will do my best ability try to explain how you can execute the job correctly without any mistakes and mishaps.
The very first step to take here and to prevent any issues along the way is to always make sure you have the correct parts available.
There is nothing more that sucks than taking everything apart only to realize that you ordered the wrong part or missing other parts to complete the job.
With that said, let’s dive into replacing your gasket with my easy-to-follow instructions that will help you save money and gain experience at the same time.
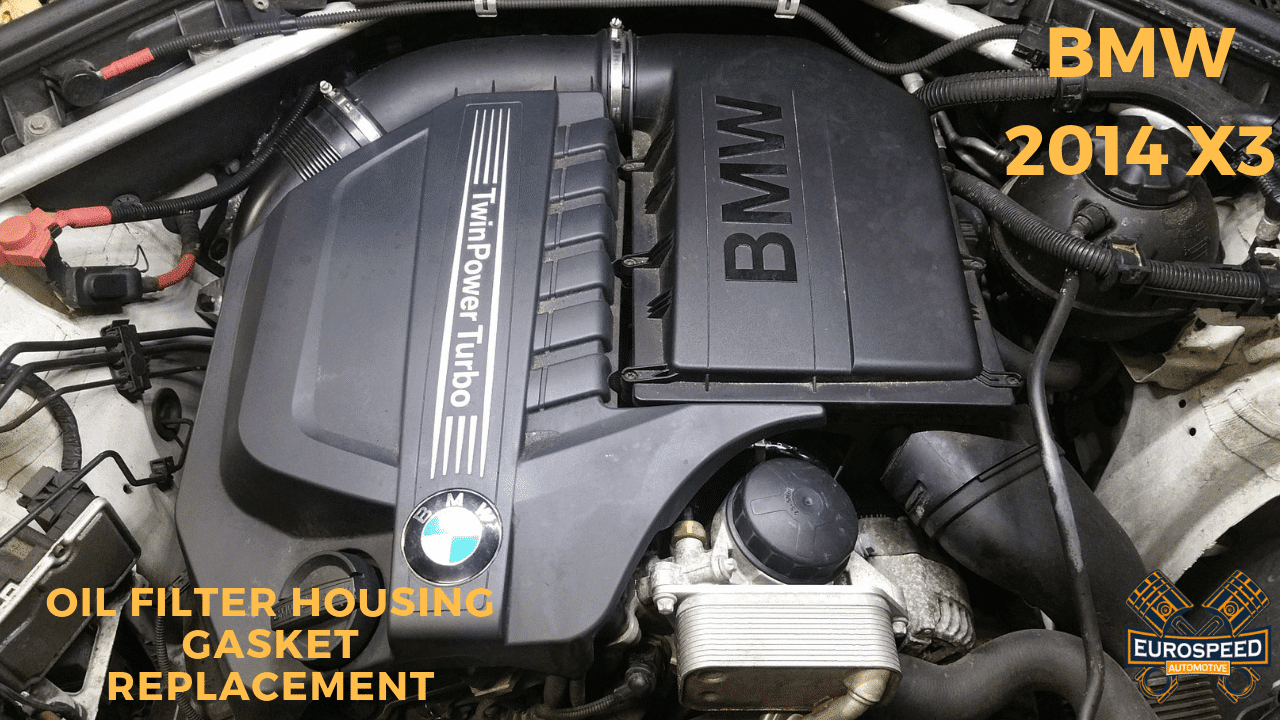
The first step to take is to lay out all your tools on the table or if you have a toolbox have them ready to start using them. now pop the hood and remove the engine cover which is easy. just grab it in the front and pull it up slowly. it has rubber grommets.
Then what you want to start doing is removing some of the plastic pieces on top of the engine such as the air duct and engine air filter box. you will have to pull upward hard to remove the box from the rubber grommets they sit on.

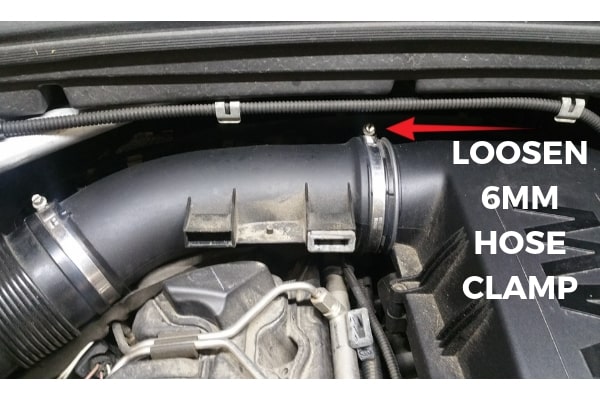
Then what you want to do next after you have removed the air duct you want to work your way up to the airbox so loosen the 6MM hose clamp as I show you in the picture below and remove the airbox completely.
Now with the airbox and air duct removed your engine bay should look like this in the picture below.
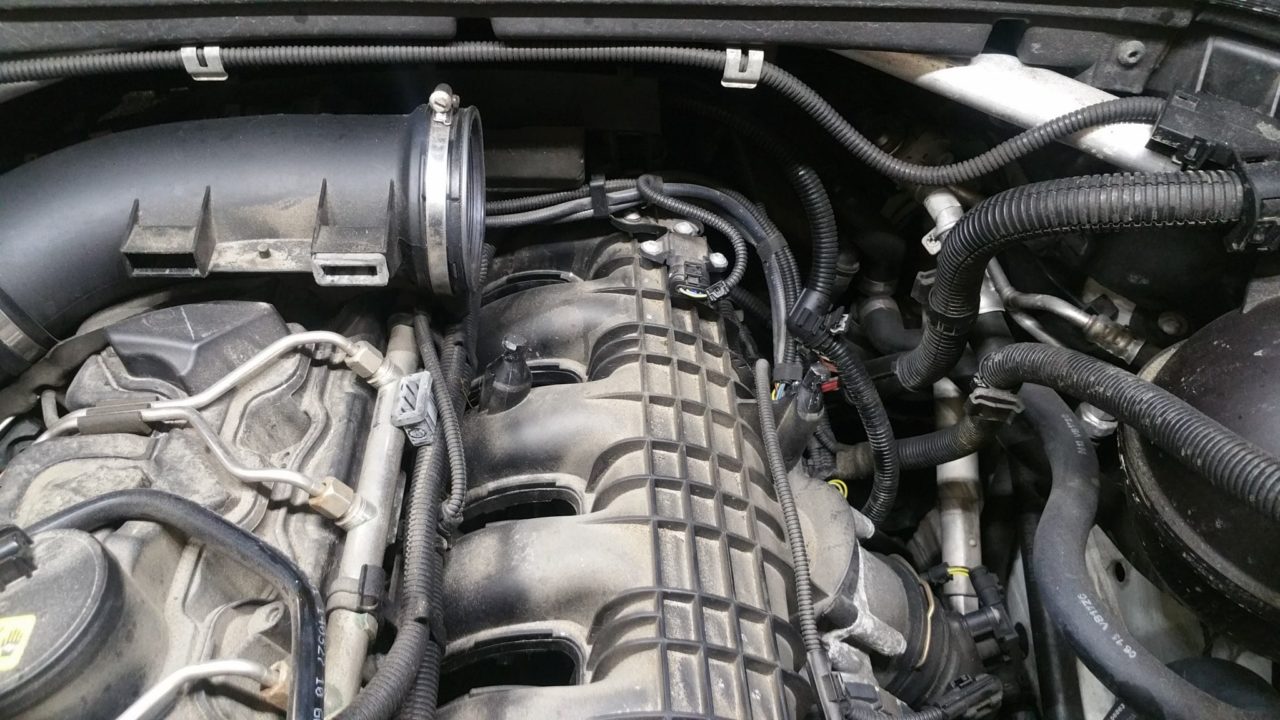
Towards the fuel rail and where you see a wire loom heading from the front of the engine heading to the back, you want to just lift it up and move it out of the way to get to the (7 to 8) 11MM nuts that bolt the intake manifold to the cylinder head.
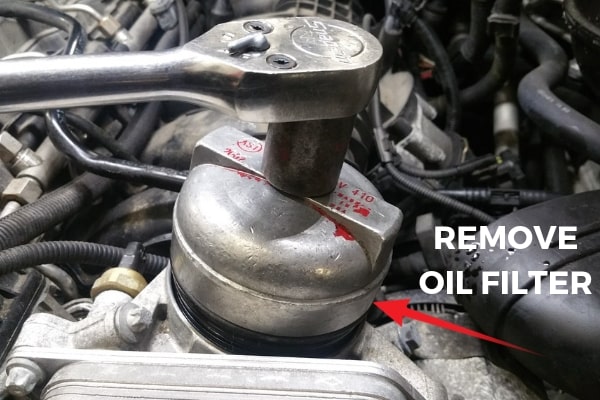
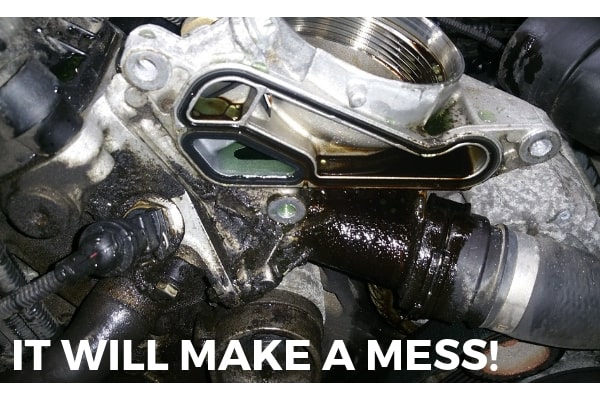
Now that you completed all the preliminary steps in order to do this job the next thing to do is loosen the oil filter so that the oil sitting in the housing can make its way down to the oil pan.
If you don’t do this then there will be way more oil and a bigger mess up there when you remove the oil filter housing. check out the picture below so you know what I mean.
The next step you want to do is to loosen all the 11MM nuts that bolt the intake manifold down to the cylinder head. this is a method I do in order to create space because there is an oil filter housing bolt that sits behind the intake manifold.
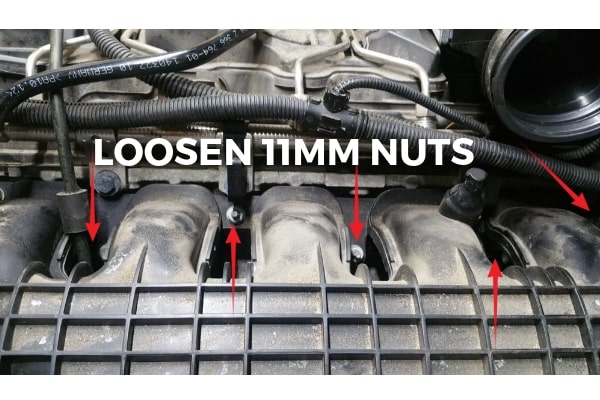
Some people remove the whole intake manifold completely but trust me you don’t have to actually remove it just unbolt it and pull it up just enough to clear the one bolt hidden behind it as I will show you in the pics below so continue reading.
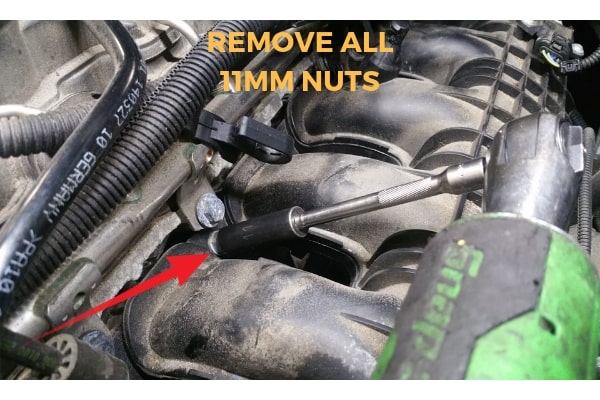
After you have removed all the intake manifold nuts and one bolt towards the front of the engine then you have to just shift it upward and pull it up so that you have enough space for the Torx E10 bolt.
Move all the wire looms and everything that might get in your way so you can have the most space possible in order to do this job without issues.
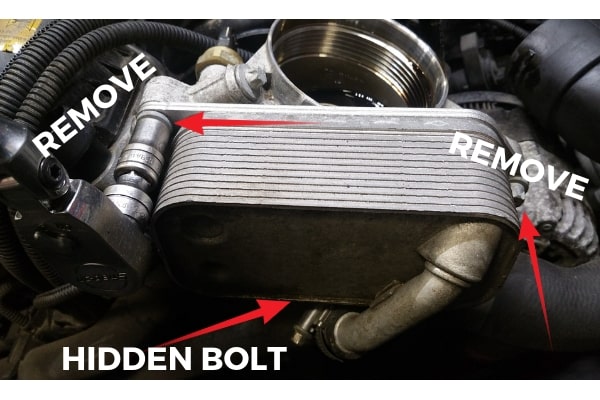
Now remove the first part of the oil filter housing. in the picture below I show you that you have to remove three Torx E12 bolts in order to remove the oil cooler.
You can use a regular 3/8 ratchet of your choice but for me, in the picture, I use a snap-on ratchet with a small adaptor and have always used this setup.
There will be three bolts in total here for the oil cooler in the picture below. for this part, you want to place a towel or a shop rag under or cover the drive belt.
You want to cover your drive belt from oil because the oil deteriorates the belt and rubber material so you want to try to keep the belt clean as possible.
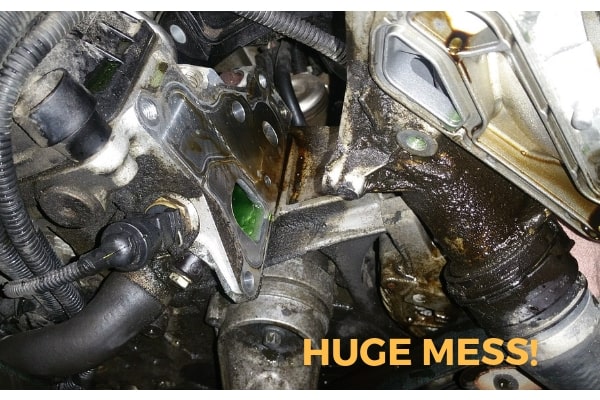
After you covered your belt and removed your intake manifold bolts the next thing you want to do now is to remove the three E12 Torx bolts that bolt the oil cooler to the oil filter housing. keep the coolant cap on to keep most of the coolant from spilling out.
After you have removed the three bolts from the oil cooler in the picture above you will have a lot of oil and some coolant leak out and make a mess so make sure you place some shop rags underneath to catch most of it.
An important habit in any technicians work ethic is to always be clean in all he or she does so try to keep it clean guys in everything you do.
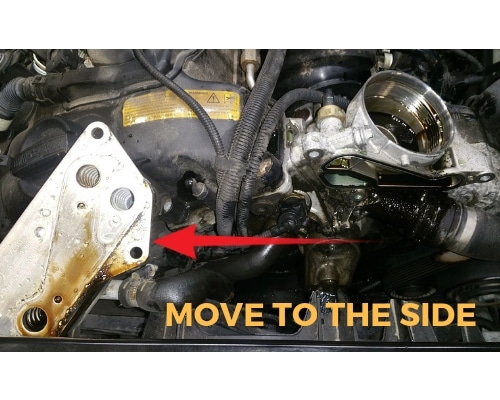
Now once you have removed the oil cooler from the oil filter housing then what you want to do is to move it to the side as I show you in the picture below and also pass a rag on it to clean it up a bit.
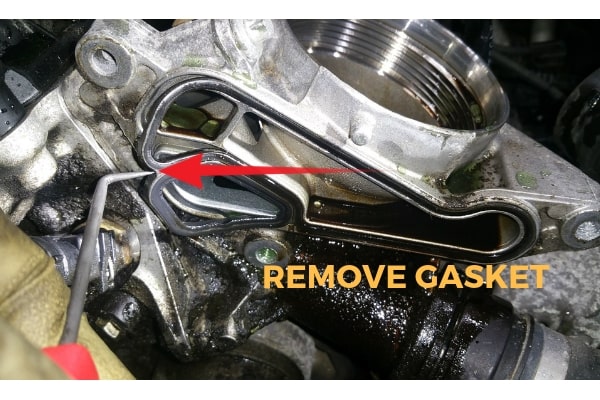
Then after that, you will want to use a right-angle pick or a pick of your choice to remove the actual gasket from the front side of the oil filter housing. there will be a total of two gaskets in the housing.
Now you have already removed the front oil cooler and the gasket for the front side of the oil filter housing and are halfway through this whole job which is amazing! keep it up.
Now the next step in order to complete this task is to actually remove the oil filter housing in itself. now we have to tackle the three bolts holding them to the cylinder head.
In the picture below there will be a Torx E10 bolt that you have to remove in order to remove the housing from the cylinder head but sometimes if it is seized or has not been removed in a long time then it can become difficult to remove.
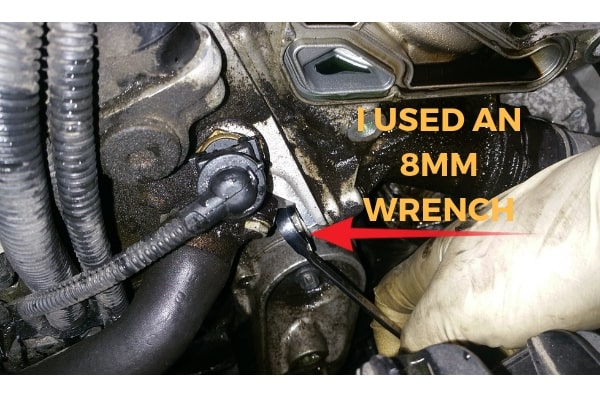
Sometimes what I do is light up the torch and pass the flame on the bolt just a few times to heat it up and expand it in order to loosen it up. do not keep the flame on it for too long so you won’t warp the housing being that it is aluminum.
Now you have to loosen the E10 bolt so you can remove the housing but for me, I use an 8MM wrench open end to remove the bolt because it was a fairly new car with low miles and it was not seized.
After you have removed this one bolt from the housing, you can actually move on to the next two bolts on the housing. remember when I told you we have to unbolt the intake manifold in order to get to one E10 bolt?.
In the picture below you will notice the one hidden bolt behind the intake manifold that we also must remove in order to remove the whole oil filter housing from the cylinder head.
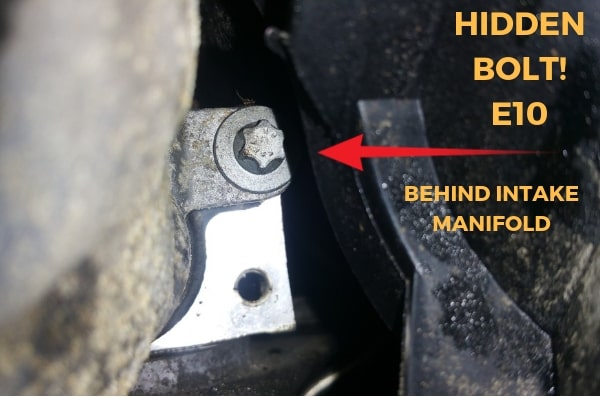
This is why we have to unbolt the intake manifold bolts in order to release the housing from the head. just pull up the manifold just enough to clear your tools.
In my case, I used a 1/4 inch ratchet with an extension and a swivel E10 socket at the end of it which makes the job a whole lot easier.
Now that you have removed the other housing bolt with the open end wrench and now you have removed this bolt the next thing to do is to remove the remaining bolt which you can’t miss because it is at the top.
The picture below will show you where the bolt is as a guide if you miss it or do not understand it.
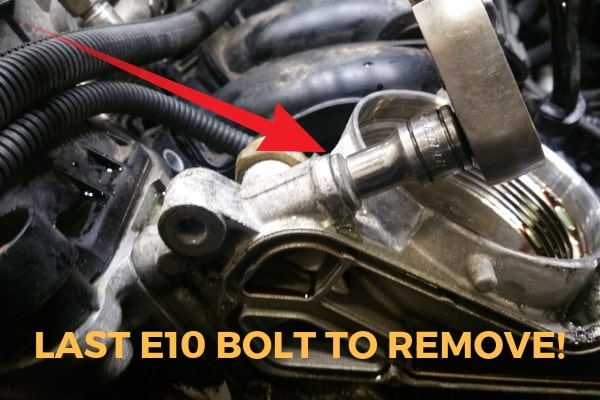
This is the last bolt to be removed in order to finish the job correctly but sometimes you can run into issues such as bolts being seized from not being removed or lubricated properly with anti-seize so it is a good habit to start putting anti-seize on all your bolts.
Sometimes the E10 Torx bolt at the bottom of the housing does not want to move so I end up torching it and if that does not move it and the head ends up being stripped, I then end up taking a chisel and hammer and chipping it counter-clockwise at the head to try to release it.
I don’t recommend this tactic for the first attempt but when working in the field for such a long time you will be bound to run into problems such as the one I mentioned and that is when experience comes into play. so hopefully it doesn’t happen to you in this case.
Now that you have unbolted all of the oil filter housing bolts it is time to actually remove it from the cylinder head. it will make a mess so be ready with rags to catch most of the oil and coolant.
If you want you can remove the upper radiator hose before you unfasten the whole housing so you can clean it somewhere outside of the engine bay but for speed it is ok to just move it to the side and then clean it all up after you install the new gasket.
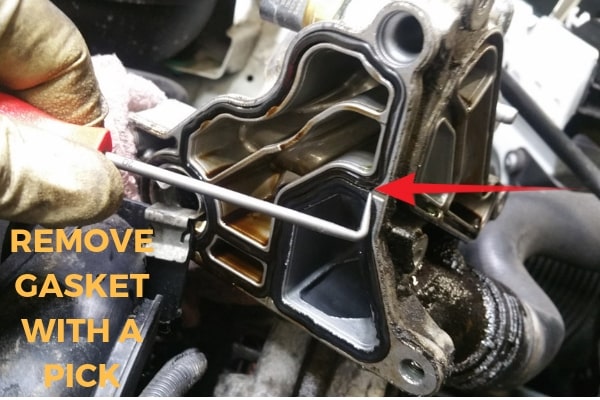
Now just use a small right-angle pick or whatever you have that will easily remove the gasket from the housing.
If you can run over to your local auto parts store and pick up at least three cans of brake cleaner and use it to clean all the excess oil that leaked out from the housing creating a big mess.
Sometimes you can clean as you go but you can also just replace the gasket and then clean up after you install the new gasket so whatever you decide to do just try to stay clean as possible.
Here at the shop what I usually do is create a mixture of 20% detergent of your choice, 30% solvent, and the rest water in a small spray bottle and spray away. let it soak and if you have a small brush laying around in the garage then use that to clean it up a bit.
After you had let the soapy spray sit and pass the brush over it to break down the oil deposit and gunk then simply blast it away with the brake cleaner and it will do justice.
Now simply wipe or blast the cylinder head clean and install the new gasket on the actual housing then bolt the housing to the cylinder head and tighten the bolts down to the head. please do not over-tighten the bolts because you can warp the housing.
Bolt the three housing bolts down and then install the new gasket in the front side of the housing and bolt those three bolts down of the oil cooler evenly.
After you have installed the new gaskets and bolted the main oil filter housing and the oil cooler on the front side of the housing then simply bring back down the intake manifold and fasten all those 11MM nuts down.
The engine air filter box will be next. then after that the air duct but to keep things simple, just install everything in reverse order and at the same time clean up all of the oil mess.
Keep in mind all of that oil you just spray and clean will travel to the bottom of the engine so you may have to jack up the car and remove the plastic cover and clean that up also.
And there you go! now you have successfully replaced your oil filter housing gasket on your N55 engine with ease!
If you enjoy this type of content please share it on your social media platforms and forums. any type of exposure to my content will be greatly appreciated. I enjoy teaching and helping others with their problems related to German cars.
Thank you for reading and happy motoring!