Jump Ahead To:
BMW E53 X5 Brake Line Failure And Why.
The reason BMW X5 models suffers from a catastrophic brake line failure is that a certain section of the undercarriage plastic cover is not protecting the lines from the outside elements and with time will corrode and start to leak brake fluid. the DSC and BRAKE lights on the instrument cluster will indicate to you that a problem is present. in this article, I will be showing you what’s involved in the system, where the actual failure is located, and how to properly fix it.
But first here is a list of the tools you need.
- 14MM Wrench
- 11MM Brake Line Wrench
- Brake Line Cutter
- Brake Bleeder Tool
- 8MM Socket And Ratchet
BMW X5 case study.
For this case study, I will be referring to the 2001 model X5 that came into the shop with the “brake” light on and the “DSC” light on. I snapped a screenshot of the fault. take a look at the picture below.
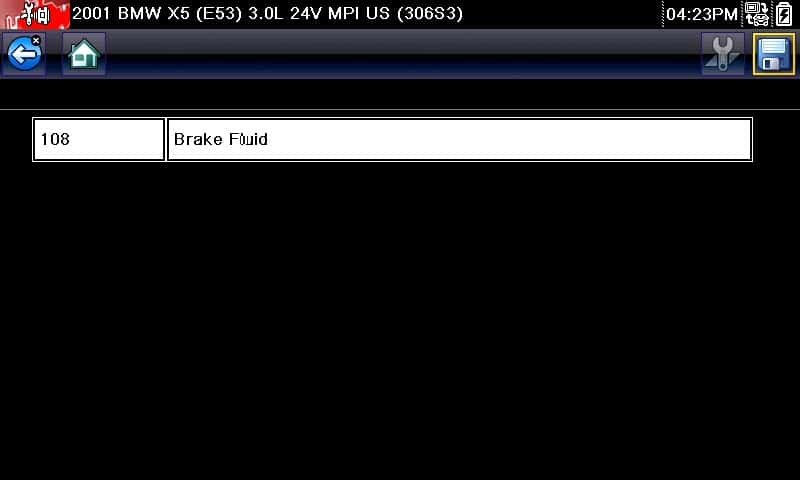
With this fault code listed, I now know which direction to go to find the possible problem. it will be within the brake system obviously but we still want to take a good approach to diagnose.
Hint: brake fluid master cylinder was empty!
But first, let take a closer look as to what exactly is involved in the brake system, how does it work, and eventually I will show you what section of the brake system failed and how to properly fix it.
Anti-Lock Brakes/Traction Control System – (ABS/ASC+T).
The system here is pretty simple and standard as in most other manufacturers and the vehicles they produce. some have more sensors and others have more electronics but the principle is standard.
This system has a hydraulic unit, a control module, 4 wheel speed sensors, ASC/DSC button on the center console, relays, wiring harness, brake light switch, and aux throttle motor if equipped like in the earlier models.
The ASC+T portion of the system interfaces with other modules in the car such as the DME(engine computer) and EGS(transmission computer) to modify shift points.
During hard braking or an emergency stop, the system tries to maintain stability and prevents wheel lock-up to maintain control of the vehicle.
It activates at a speed greater than 6MPH and deactivates when a speed reaches lower than 3MPH. when accelerating from a standstill the system also optimizes stability and traction.
During the control phase or when the system applies itself when it sees a loss of control scenario the control module sends a signal to the engine control module and tells it to decrease power.
When this happens the ignition timing is also retarded or slowed down to help maximize control of everything as the ABS/ASC module calculates that the vehicle is going through a slip condition.
The ABS kicks in only if the car is traveling of speeds less than 60MPH. for speeds up to 24MPH braking of individual rear wheels has the same effects as a limited slip differential and it increases traction surprisingly.
Dynamic Stability Control System – (DSC).
So much to say and talk about when it comes to this system. I can go on for days just mentioning its features and how many times it has helped me get out of a jam while driving in wet conditions.
For the most part, the DSC system is definitely an enhanced version to the earlier models with ASC+T system.
Some of the objectives of this system are to optimize stability while cornering very hard and aim to keep the vehicle stable for agile maneuvering throughout the powerband.
The DSC system is actually integrated into the ASC+T system to combine functionality. it monitors the steering angle sensor reading, lateral acceleration, brake pressure, and overall movement around its vertical axis.
If one of the wheel speed sensors picks up a discrepancy and variation between sensor readings then the system avoids wheel spin by reducing engine torque.
Also if it does detect any slipping issues then the computer can either apply braking force to the rear wheels or to the front wheels in order to stabilize the vehicle and regain control under slipping conditions.
The ABS indicator light and ASC+T lights on the instrument cluster when you turn the vehicle key into position two and does a standard system check to see if all the system is working properly and turns off after about few seconds.
If a problem is detected within the system then the indicator light will remain on and the ABS/ASC+T will be disabled but then the vehicle will convert to regular braking.
How does it all work together?
Some of this if not all of this might not make much sense to someone who is not very familiar with BMW’s and the features that the vehicles are equipped with but I will explain to you the best way I can.
The ABS/ASC+T computer reads information from all the input sensors then processes it and makes adjustments accordingly. it reads the acceleration, deceleration and slips factors from the four wheel speed sensors.
If DSC is a part of the system depending on the vehicle model then the ABS/ASC+T processes information from the other input sensors such as steering angle sensor, lateral acceleration, brake pressure and movement of the vehicle around its verticle axis.
Based on all these input signals and information that the computer receives it then determines the proper behavior by responding accordingly and correcting any issues while driving.
After it receives information from all the input sensors and processes it all together then the computer sends electronic signals to the hydraulic unit which has electromagnetic valves within it and brakes the wheel that is slipping.
The control module has electronic monitoring circuits that ensure proper operation of the whole system. so if the system detects any faults such as wiring issues or components not working then the light will be turned on in the instrument cluster.
Now if there is an issue within the ABS system then both systems will be turned off and braking will return to normal standard braking and the warning light will be lit on in the instrument cluster.
What is the hydraulic unit?
The hydraulic unit of the ABS/ASC+T system is an electromagnetically valve block that has four channels to allow braking to each individual wheel caliper.
In order to control the braking pressure of the system, the hydraulic unit is equipped with a three-way valve that has three separate brake pressure conditions standard from the factory. the three conditions are pressure build up, pressure retention, and pressure drop.
When any of the wheel speed sensors pick up a wheel locking up then the hydraulic unit reduces brake fluid pressure on that wheel. but if the wheel continues to lock up then it reduces even more brake fluid pressure until slippage is noticed from the wheels speed sensor.
After that, the pressure is then built up again within the system and the control phases are repeated again. the time it takes to achieve the phases can be measured in milliseconds which is unbelievably fast.
After the three phases are processed then the return delivery pump returns brake fluid from the brake calipers in each wheel and keeping the right pressure throughout the whole system. also in this dual brake circuit system, the pump is a two piston design so they are separated.
What are wheel speed sensors?
Wheel speed sensors are exactly what it describes itself to be. each wheel has one sensor each located in each wheel hub. each sensor generates a signal when the vehicle is moving forward or backward. the sensor sends a signal back to the ABS/ASC+T control unit and that signal gets processed through the module and it knows how fast the wheels are spinning.
Either the rear axles or the front wheel hubs are equipped with tone rings and as they spin the wheel speed sensor generates a unique square wave signal and the control module sees that signal and makes its determination. wheel speed sensors are a major input signal to the actual control module and it uses that signal to determine what is actually happening with the vehicle.
What failed here and how to fix it?
So now to the meat and potatoes of this whole article and why you are actually here for. if you have made it this far then I thank you and now from here below I will be explaining what failed and how I ended up fixing it and what I did to fix it.
When I lifted up the vehicle on the lift I noticed that underneath the driver side undercarriage was wet. now I had my suspicion as to what that fluid might have been and by removing that plastic cover it did reveal that it was brake fluid leaking from a section of the brake line.
The pictures below are the pictures from the find and the repair procedure. the repair is pretty simple. you simply cut the line and replace it with brake line from the parts department or store.
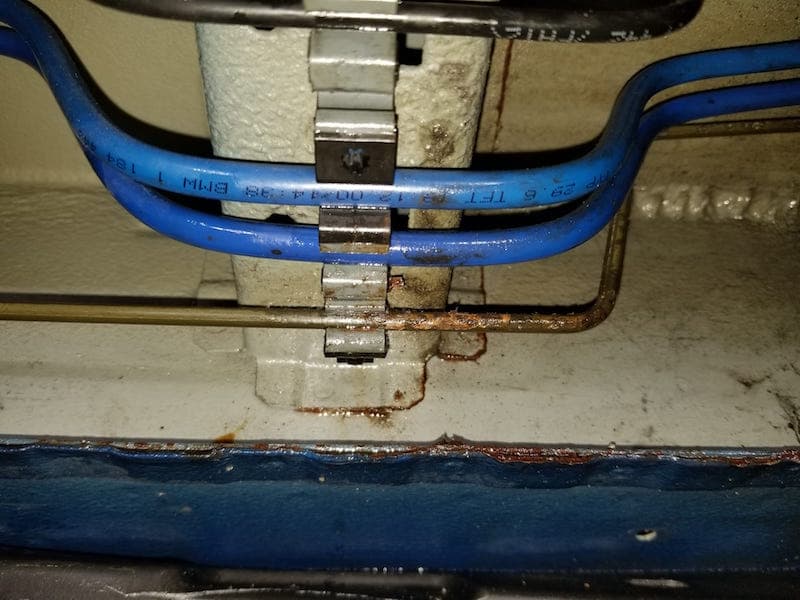
In the picture above is where the fault accrued under the driver side of the truck. noticed all the rust and the moist area from the fluid leaking out of the line. disregard the two blue lines. those lines are for emissions only. one blue line is for gas and the other the evap system.
Just one of the lines were actually rusted enough to cause a slight leak in the system but as a precaution, I ended up replacing both sections of brake lines going to the rear axle just because of the potential problem it could’ve caused in the future.
So for step one, you would want to remove out of place both lines that are attached to the brake line holder brackets and use the wrenches to remove the brake line from its connection as I show you in the picture below.
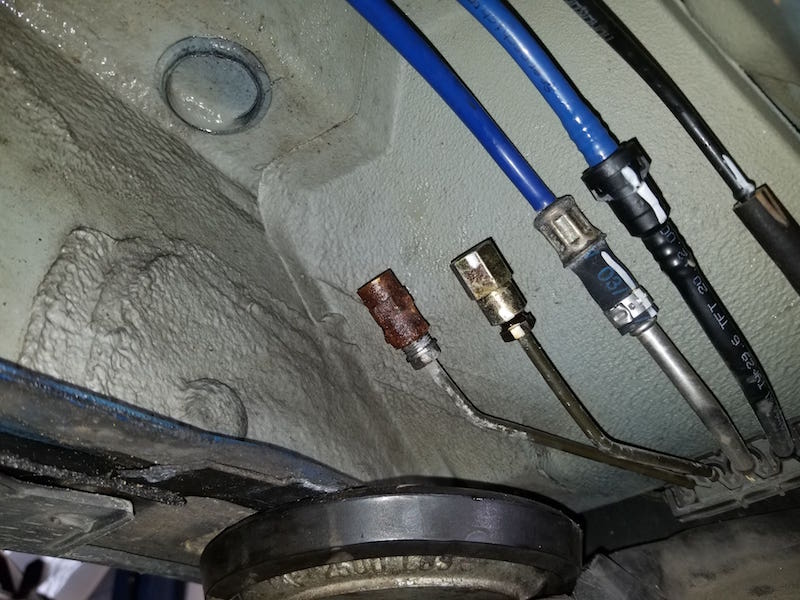
After that when you have finally disconnected the lines form the connection shown above now what you would want to do is cut the line a little past the bracket or past where the rust starts and use the brake line cutting tool and make a clean cut.
Now what you want to do is place the brake line that you ended up cutting and place it on a table. after that then use the new brake line that you bought and slightly bend the new brake line to look very similar to the brake line you just finished cutting so it fits properly when installing the new line.
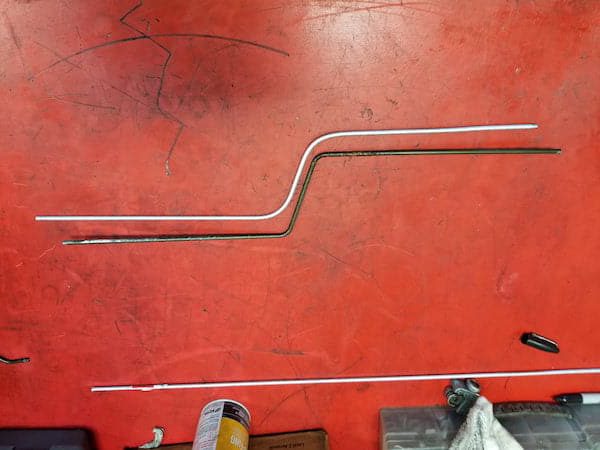
My cut is by far not the most perfect but I tried cutting it to match the line I just finished cutting off. so you want to make two clean cuts to resemble the original line you just finished cutting off from the vehicle.
The next step to take is to join the brake line you just finished cutting and join that fresh new brake line to the brake line that’s left on the car. so in my case I join the new brake line to the original brake lines that are going to the rear axle.
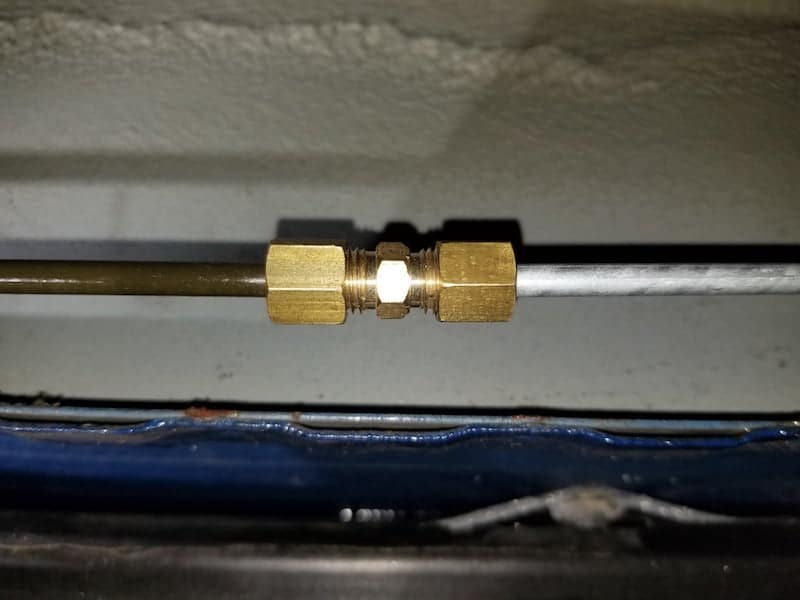
The picture below is the way you want to set up the fitting because you can install the direction wrong and it will leak so pay close attention to the details.
Make sure to take a straight pick if you have one and look into the new brake line and stick the pick inside and open the diameter of the line because if not it may cause a pressure build up or a hard brake pedal.
Now the picture below is how you will want the new brake line to look if it is installed properly. it is pretty simple and straightforward but if you do run into any problems you can shot me a quick email and i will respond asap.
This is what you want to do to the other line running across the line that started to leak if you do decide to cut the other line and prevent it from failing in the future which would be ideal. make sure it fits properly and tight and tightened both sides.
The picture below is a picture of the brake line cutter tool I used and how the fitting is used according to the line. I know it looks pretty old in fact it is probably older than me but it worked just fine and cut the line just as I wanted.
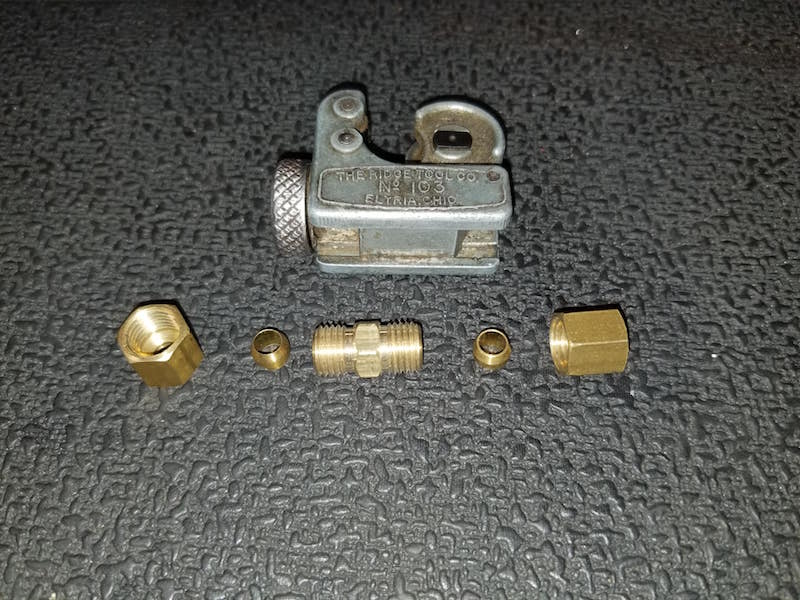
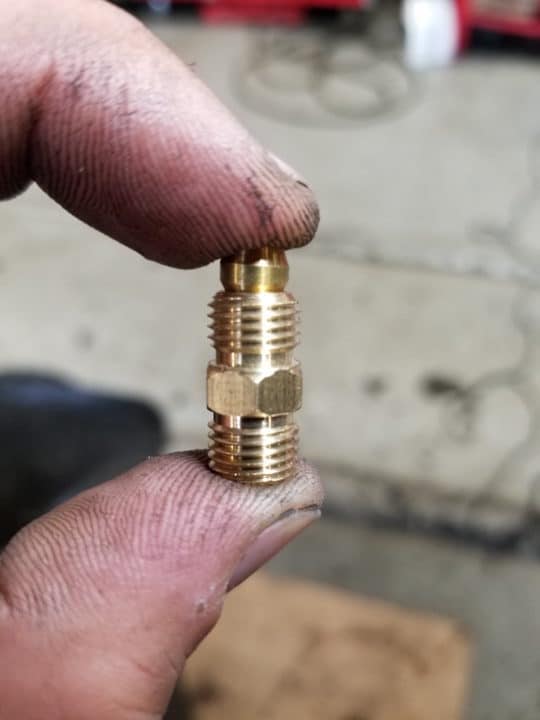
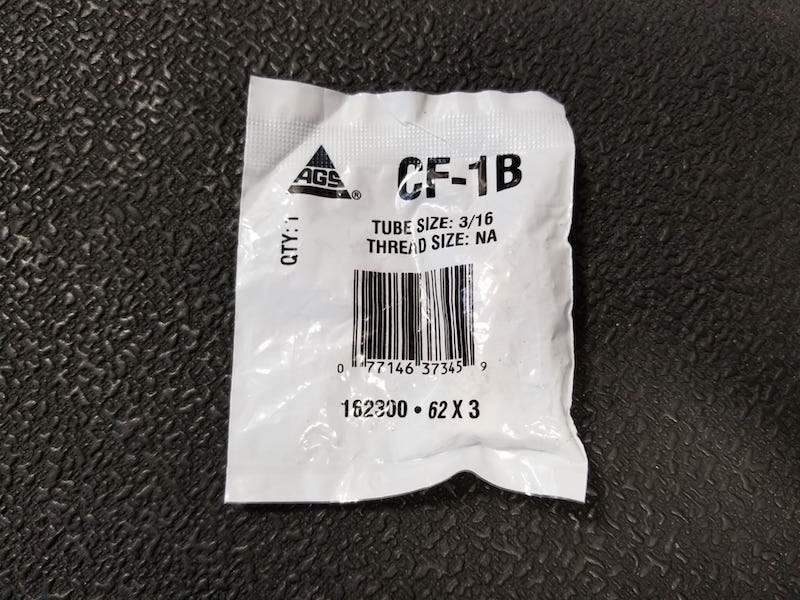
And the picture below is the actual part and number I used to make this repair and by far it is the least expensive and worked just fine and it did the job we wanted.
By now you should have already cut the brake line and connected the old brake line with the new brake line and attached the new lines into the system. so what you want to end up doing is cutting it at four places. two places in brake line number one and two places in brake line number two.
So you cut one brake line after where it started to leak and then you want to loosen the brake line at the connection of the original brake line connection. then make one cut close to the connection where you used the wrenches to loosen the line and then make the other cut going towards the rear axle and after the leak.
After you have cut the lines and replaced them my best advice for you to do is to take primer spray paint and spray the lines and area where you replaced the brake lines and give it a nice coat of paint. then let it dry and paint the lines where you replaced black to help with longevity.
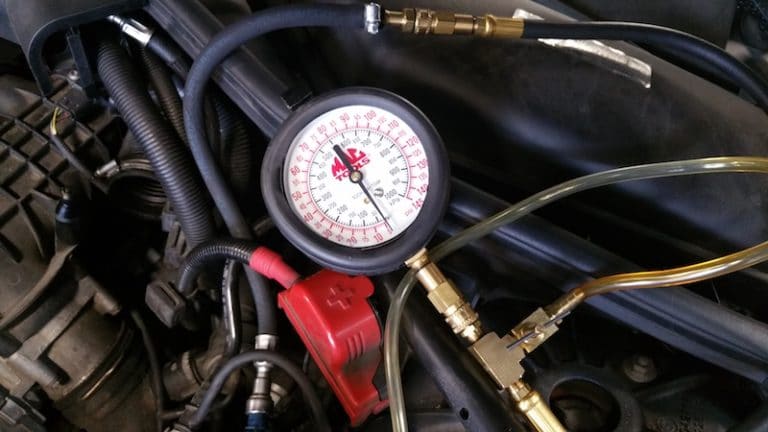
Then the last and final step is to either have someone help you bleed the brakes or if you have access to an air compressor you can use a brake bleeder tool that can automate the process.
If you enjoy this type of content please share on your social media platforms and forums. any type of exposure to my content will be greatly appreciated. I enjoy teaching and helping others with their problems related to European cars.
If you haven’t yet please subscribe to my newsletter here to stay up to date on a weekly post on subjects like diagnosing, repair, industry news and much much more.
Thank you for reading and happy motoring!